| GoAntiquing! Start the 45-day FREE trial! (800) 385‑7911 |
 |


This is the Dealer Managed Inventory (DMI) system. You can enter your inventory of items, edit them, delete them, and most importantly - print your own labels.
Q: What is the best way to get started?
 A: First, read through this introduction and watch the video! Deeper questions may be best to take to your shop manager as the best person to give you basic info about how this will be used, and will be the person who you go to with problems or for advice. If the shop manager needs some guidance, they come to GoAntiquing! Support. As a dealer or vendor in a shop you do not get direct support from GoAntiquing, sorry, but we strive to help, and so we find it is best to help the manager who can then help all their dealers or vendors equally.
Q: Some of this looks really complicated!
A: Let's take it in little by little. It's not that bad you just need to understand the options and what they do. BTW, you can use the option to "Switch to Easy" mode, which gives you fewer options, but there is likely a lot to still be explained.
OK, then let's dive into the screen and the options.
The DMI screen is broken into two major sections, Inventory Options and Inventory.
Inventory Options
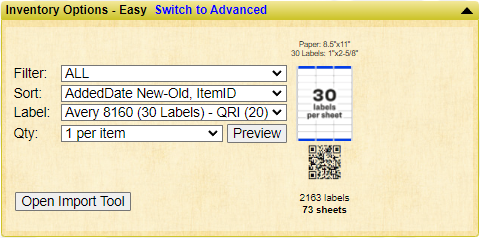
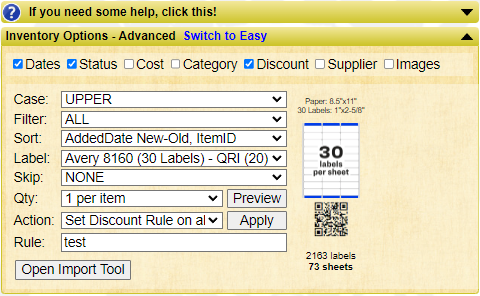
As it's name suggests this is where you select various settings to control how you view the Inventory, what fields of data you can change and how you print your Labels. When you first open up DMI you will be in simple 'viewing' mode; clicking the 'Edit Inventory' button then shows a few more setting options and the Inventory list becomes editable. If you use 'Easy' mode there are fewer options and 'Advanced' mode shows all options. For completeness we will discuss the full set of options under 'Advanced' mode.
 Initial 'View Only' Options |
 Edit with 'Easy' Options |
 Edit with 'Advanced' Options |
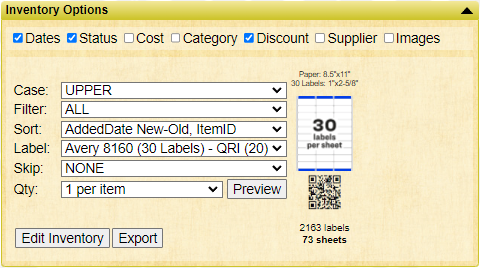
- The first section is a row of checkboxes; Dates, Status, Cost, Category, Discount, Supplier and Images. Putting a check in these boxes changes what data fields are shown.
- The next section is where the heart of how DMI operates is configured.
- Case: You can select how the text will show, options for forcing 'UPPER' case, using 'Proper' case (initial letter of each word captialized), or 'Leave as is' which is simply to show it as you entered it.
- Filter: This allows you to limit what is shown in the Inventory listing. Options are; 'ALL' where everything is shown, 'Checked items only' which means the items that have the checkbox on the left checked, 'Unchecked items only', 'Discount Active' where only items that have a discount that is currently active based on date range are shown, and then the advanced option 'Filter by example'.;
- Sort: This controls the order in which the items in the Inventory listing are shown. These are shown by field name or names and whether the sorting will be forward or reverse direction.
- Label: The type of label you will print. The two basic types of labels, as far as paper is concerned, are Sheet Labels such as Avery Labels, and Roll Labels. Currently for sheet labels we support the 30 label Avery 8160, the 60 label 8195 and the 80 label 8167. For Roll Labels we currently support a 1.125" by 1.125" label (note: our measurements are side to side and perforation to perforation, the label itself is smaller), 2.125" by 1.125", and Jewelry Labels at 2.3125" by 0.5" (
 Some Jewelry labels have a 'black bar' on the reverse to help alignment). You can then pick what type of barcode will print or if just printing your DealerID and ItemID. A graphic will appear to the right showing a representation of the Label Type and which barcode style will print based on selection. More about barcodes later...
 - Skip: How many labels to skip before first label is printed. This is mainly useful when using Sheet Labels and you want to use the remaining labels on a partially used sheet.
- Qty/Preview: There are 4 options in this list; 'Use LQ (Label Quantity)' which is very useful if you just want to print a few and not all of a given item, 'Use Qty' which is the number entered into the Quantity field - this is considered 'Quantity on Hand' or what is already at the shop, then there are two simple options '1 per item' and '2 per item' these can be useful if building a scanner 'cheat sheet'. Click the 'Preview' button to open up a new window showing all the labels, you then need to print these using whatever technique your web browser has, in Windows operating systems this is either a menu option or Ctrl-P.
 Strongly recommend you test just 1 or two pages when printing to Sheet Labels to ensure alignment is correct!
 - Action/Apply: There are too many option in this dropdown to fully document, the descriptions should make it clear what each options does. Once you select an option if you then click Apply the action will be carried out (with a confirmation prompt).
- Rule: This is an advanced feature that allows you to enter in the exact name of a Discount Rule the shop has setup for you, one example might be '10% off items over $20'. Setting such a rule will then cause discounting to occur as stated (if the rule is setup correctly at the shop, so this would be an option you would discuss with the shop manager before using).
- Open/Close Import Tool: Clicking this button will open up a new panel to the right (on wide-screen) or below (on narrow screens) that allows you to 'Paste' data into a box. The data you would paste is documented in gray text in the box and you should be sure and use the exact field names. The data you paste is expected to have been copied from either a Google Sheet, Excel, or some other program that creates a 'Header' row of field names and then 'Data' rows that contain what the header describes. Then you click the Import button, approve a confirmation box, and the import process gets going - results such as Adds, Updates, Errors and Warnings are show in a Results box.
Inventory
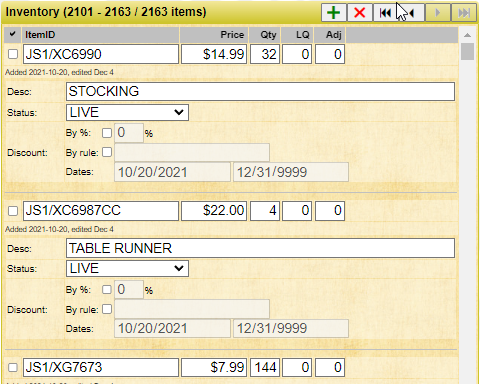
This section shows the total count of items (which might be limited by the Filter option) and toolbar with 6 icons to allow Adding a new item, Deleting 'checked' items, and navigating through the items in increment of 100 items at a time. And of course the listing of all the filtered items.
 Listing with 'Advanced' mode on a narrow display |
 Listing with 'Easy' mode on a wide display |
- Toolbar:
- ➕ icon will add a new item and by default will create a new ItemID based on automatically incrementing the higher number currently in Inventory - which you can then change of course.
- ❌ icon will delete all checked items - you will be prompted to confirm a delete. BTW, items are not TRULY deleted at first, the item Status is set to 'DELETED' - and then the next time the shop 'synchronizes' the data those items will be truly deleted. This is also a good time to mention what happens when the shop deletes one of your items! What occurs is that you may see some items with Status shown as 'SHOPDELETED' - depending on what the item was that was deleted you may want to contact the shop to find out why, and if you think it was a mistake you can change the status back to LIVE.
- The next 4 icons are simple data reverse and forward functions.
- Listing:
- The data you will see is dependent on which checkboxes you selected on the top row of Inventory Options.
- Just click into any of the available fields and change as you see fit. There is no UNDO! So be careful. Changes are saved automatically as you tab/click through the fields.
- Some pointers; (1) Once you print labels do not change the ItemID of any printed items as doing so will make the previously printed items unrecognized! (2) The shop may have selected an option that requires your DealerID or VendorID be part of the ItemID. Since the ItemID has a maximum length of 16 characters and a DealerID can be 8 characters, and including the '/' separator that would limit your ItemID to 7 character max. Most Dealer/VendorID's are shorter than 8, you would need to just count how long your ItemID can be to avoid it being shortened automatically.
- What about 'Status'? After you add a new item the Status is set to 'ADDED'. You can change that to 'LIVE' (or LIVE1/2/3/4), 'PENDING' which implies it is in the list but not available to sell - yet, 'HISTORICAL' means the item is possibly gone for good, but you might change it back to 'LIVE' some day, there there are up to 4 'SEASONAL' status values that could be used for marking items as really only in stock at certain times of the year.
- OK, but what are all these 'Quantity' columns!? Yes, there are several...
- 'Quantity' or 'Qty' means 'Quantity on Hand at the shop'.
- 'Label Quantity' or 'LQ' is the number of Labels you may want to print Note: there is a special 'Action' that allows LQ to be added to Qty when you finish printing - this is a manual step not automatic!
- 'Adjustment Quantity' or 'Adj' is a value that if is not zero, when the shop synchronizes inventory that will be added to Quantity. Some of these options seem redundant but there is a case for each use.
- 'Quantity' or 'Qty' means 'Quantity on Hand at the shop'.
Barcodes - QR, QRI, and Code 128
We strongly encourage most dealers to use either QR (quick response) or QRI (quick response item) codes. QRI are really really useful! If you use QRI codes the shop does not even need to get the items into their 'Item Master' as the QRI contains all item information.
- Code 128: This is a traditional 1D barcode, a series of black lines of varying width. Not recommended. It is retained 'just in case' you have to use it for some reason, but results are YMMV (your mileage may vary) as the encoded data can generate w very 'wide' barcode that might get truncated or cropped to the right and left of the label's printable area.
- QR* code: Choosing QR will 'encode' your DealerID, a '/' character and the ItemID into a 2D code. When scanned at the shop that information is decoded will be used locate and populate the Description, Price, and any Discounts you are running.
- QRI* code: The code will have your DealerID, ItemID, item Description (up to 100 characters max), and Price. The value of this option is that it is all self-contained. Discounts are not encoded as they are usually time-sensitive. The shop can setup discounts for your DealerID that would apply based on date range or specialized rules.

When scanned this code generates: ||QRI;JS1;;205324886;Blank Test;12;